Author: Charles Zhu
Summary: 动画学习
前言
偶然发现iPhone QQ 显示消息条数的小红点可以响应动作事件,也有人问我这样的动画该怎么做,这里就把实现的思路简单的描述一下。在实现的过程中,同样发现该功能并没有看到的那么简单,要做一个完备的动画效果需要有一定的功底。因此,本篇会先侧重于实现思路,并不会实现一个一模一样的效果。
下面是iPhone QQ小红点的动作交互效果:

分析
首先我们分析拖拽时候的表现:
- 原先的小红点顺着手指移动,并与原来所处位置通过一个小尾巴(即移动的轨迹)连接
- 与原先位置在一定范围内时,小尾巴出现;超过一定范围时,小尾巴不出现
- 释放手指,小红点回到原先位置,并有弹簧动画效果
- 释放手指时离原先位置超过一定范围则不返回原点,而是有消失的泡沫动画
抛开细节,抓住要点,我归纳了几个要点:
- 小原点随手指移动
- 小尾巴分情况出现
- 手指释放后,小红点弹回原先位置
除此之外,红点上的文字,消失等情形的处理不是主要问题,我们先缓一缓。
实现
红点的移动
首先实现一个圆形的view,并且可以随手指移动。在一定移动范围内,手指离开后,view返回原处并带有弹簧效果;超出范围,view则停留在手指离开处。
我们通过drawRect:来画一个圆;设置一个CGPoint的对象来记录开始触摸时的位置;接着就是实现相关的touchEvent:。因为都是很基本的内容,直接上代码。
//头文件
@interface ZZSpringView : UIView
- (instancetype)initWithSquareLength:(CGFloat)length originPoint:(CGPoint)oPoint;
@end
//类文件
const CGFloat kOffset = 100.0;//拖拽的范围限制
@interface ZZSpringView ()
{
    CGPoint pointOriginCenter;
}
@end

@implementation ZZSpringView
- (instancetype)initWithFrame:(CGRect)frame
{
    if (self = [super initWithFrame:frame])
    {
        pointOriginCenter = self.center;
        self.backgroundColor = [UIColor clearColor];
    }
    return self;
}
- (instancetype)initWithSquareLength:(CGFloat)length originPoint:(CGPoint)oPoint
{
    if (self = [self initWithFrame:CGRectMake(oPoint.x, oPoint.y, length, length)])
    {

    }
    return self;
}
// Only override drawRect: if you perform custom drawing.
// An empty implementation adversely affects performance during animation.
- (void)drawRect:(CGRect)rect {
    // Drawing code
    CGContextRef context = UIGraphicsGetCurrentContext();
    CGContextSetAllowsAntialiasing(context, true);
    CGContextSetShouldAntialias(context, true);

    CGContextAddEllipseInRect(context, rect);
    CGContextSetFillColorWithColor(context, [UIColor redColor].CGColor);
    CGContextFillPath(context);
}

- (BOOL)_isDistanceEnough:(CGPoint)point
{

    CGFloat distance = (point.x - pointOriginCenter.x)*(point.x - pointOriginCenter.x) + (point.y - pointOriginCenter.y)*(point.y - pointOriginCenter.y);
    if (distance > kOffset * kOffset)
    {
        return YES;
    }
    return NO;
}

//touch event
- (void)touchesBegan:(NSSet *)touches withEvent:(UIEvent *)event
{
    UITouch *touch =  [touches anyObject];
    pointOriginCenter = [touch locationInView:self.superview];

    [UIView animateWithDuration:.3 animations:^{
        self.center = pointOriginCenter;
    }];
}

- (void)touchesCancelled:(NSSet *)touches withEvent:(UIEvent *)event
{

}
- (void)touchesMoved:(NSSet *)touches withEvent:(UIEvent *)event
{

    UITouch *touch =  [touches anyObject];
    CGPoint pointMove = [touch locationInView:self.superview];
    self.center = pointMove;
 }

 - (void)touchesEnded:(NSSet *)touches withEvent:(UIEvent *)event
{
    UITouch *touch =  [touches anyObject];
    CGPoint pointEnd = [touch locationInView:self.superview];
    CGFloat distance = (pointEnd.x - pointOriginCenter.x)*(pointEnd.x - pointOriginCenter.x) + (pointEnd.y - pointOriginCenter.y)*(pointEnd.y - pointOriginCenter.y);
    if ([self _isDistanceEnough:pointEnd])
    {
        //may be destory self animation
        self.center = pointEnd;
        pointOriginCenter = self.center;
    }
    else
    {
        [UIView animateWithDuration:1.0
                              delay:.0
             usingSpringWithDamping:0.1
              initialSpringVelocity:.0
                            options:0
                         animations:^{
            self.center = pointOriginCenter;
        }
                         completion:^(BOOL finished) {

        }];

    }
}
在touchBegin事件中,因为点击小红点的位置与中心会有偏移,通过UIView animation做一个平滑的过度。而在touchEnd事件中,返回弹簧震荡的效果是使用UIView的Spring animation。
添加小尾巴(轨迹)
我画了一张简化的模拟拖拽过程的图:
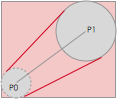
虚线圆是view原来的位置,P0是其圆点;实线圆是移动的位置,P1是圆点。设置两圆的切线(红色),把封闭的部分都填充为同一个颜色的话,就能大致模拟出相似的效果。这里隐含了几个前提:
- 实际的轨迹是带有弧度的曲线,这里使用了切线来代替(红色的切线)
- 拖拽的时候,原先位置的圆形view会随拖拽距离变小,这里设置为一个固定大小的圆(半径为原来的一半)
鉴于此,我们需要求出的是两对切点的位置,使之成为一个封闭图形进行填充。同时,虚线位置的小圆也进行填充。这样,就基本完成类似的功能。
首先我们需要扩展当前context的范围,为了简便,通过添加尾巴的子view来实线,这样可以利用原先的红点view。现在我们已知P0,P1,以及各自的半径,然后求外围矩形的位置和长度。因为可以按任意方向拖拽,按当前的计算方式,需要分四种情况讨论。按笛卡尔坐标系的划分,图例是第一象限的情形。同理还有二三四的可能。为了迅速验证方案的可行性,这里只对第一象限进行讨论和模拟。
定义新view:
typedef enum : NSUInteger {
    ZZLineDirection1=1,//northease
    ZZLineDirection2,//northwest
    ZZLineDirection3,//southwest
    ZZLineDirection4//southeast
} ZZLineDirection;

@interface ZZSpringTailView : UIView
@property (nonatomic, assign) ZZLineDirection lineDirection;
@property (nonatomic, assign) CGFloat radius;//centerradius
@property (nonatomic, assign) CGFloat moveRadius;
@end
ZZLineDirection代表的是某象限,radius是P0的半径,moveRadius为P1半径。
我们在touchMove事件中添加一个view,在此之前,我们会在ZZSpringView中添加一个ZZSpringTailView实例,用于内部访问。touchMove的实现更新为:
- (void)touchesMoved:(NSSet *)touches withEvent:(UIEvent *)event
{

    UITouch *touch =  [touches anyObject];
    CGPoint pointMove = [touch locationInView:self.superview];

    if ([self _isDistanceEnough:pointMove])
    {
        //beyond the offset, hide the view
        if (tailView)
        {
            tailView.hidden = YES;
        }
    }
    else
    {
        //redraw the view
        self.center = pointMove;
        if (!tailView)
        {
            tailView = [[ZZSpringTailView alloc] init];
            [self addSubview:tailView];
        }
        CGFloat widthHalf = self.bounds.size.width/2.0;

        CGFloat minX = 0;//= MIN(pointMove.x, pointOriginCenter.x);
        CGFloat minY = 0;//= MIN(pointMove.y, pointOriginCenter.y);
        CGFloat radius = widthHalf;


        //the width: the distance betweent two points and the origin size's width/2
        CGRect frameInSuper = CGRectMake(minX, minY, fabsf(pointMove.x - pointOriginCenter.x)  + widthHalf + radius, fabsf(pointMove.y - pointOriginCenter.y)  + widthHalf + radius);

        tailView.radius = radius/2;
        tailView.moveRadius = radius;

        if (pointMove.x >= pointOriginCenter.x && pointMove.y <= pointOriginCenter.y)
        {
            NSLog(@"direnction1");
            tailView.lineDirection = ZZLineDirection1;
            frameInSuper.origin.x = pointOriginCenter.x - radius;
            frameInSuper.origin.y = pointMove.y - radius;

        }
        else if (pointMove.x <= pointOriginCenter.x && pointMove.y <= pointOriginCenter.y)
        {
            NSLog(@"direnction2");
            tailView.lineDirection = ZZLineDirection2;
            frameInSuper.origin.x = pointMove.x ;
            frameInSuper.origin.y = pointMove.y;
        }
        else if (pointMove.x <= pointOriginCenter.x && pointMove.y >= pointOriginCenter.y)
        {
            NSLog(@"direnction3");
            tailView.lineDirection = ZZLineDirection3;
            frameInSuper.origin.x = pointMove.x - radius;
            frameInSuper.origin.y = pointOriginCenter.y;
        }
        else
        {
            NSLog(@"direnction4");
            tailView.lineDirection = ZZLineDirection4;
            frameInSuper.origin.x = pointOriginCenter.x - radius;
            frameInSuper.origin.y = pointOriginCenter.y - radius;
        }
        tailView.frame = [self convertRect:frameInSuper fromView:self.superview];
        [tailView setNeedsDisplay];
    }

}
这里的实现是把tailview添加到springview之上,通常情况下,clipToBouds默认是NO的,因此这种添加超出父view bound 的子view方案是可行的。需要注意的是,上述的两个point是在spring view的父view内的,因此,在最后确定tailView frame的时候需要转换到springView的坐标系。
接下来就是tailView的drawRect实现。这里主要需要做2件事情:
- 绘制P0为圆心的圆
- 绘制2对切点构成的封闭图形
drawRect的部分实现:
- (void)drawRect:(CGRect)rect
{

    CGContextRef context = UIGraphicsGetCurrentContext();
    CGContextSetAllowsAntialiasing(context, true);
    CGContextSetShouldAntialias(context, true);

    CGContextSetStrokeColorWithColor(context, [UIColor greenColor].CGColor);
    CGContextSetFillColorWithColor(context, [UIColor redColor].CGColor);
    CGContextSetLineWidth(context, 2);

    CGPoint pointStart, pointEnd;//center

    CGPoint movePoint1, movePoint2;//移动圆的2个切点
    CGPoint centerPoint1, centerPoint2;//原有圆的2个切点
    CGFloat moveRadius = _moveRadius;//移动圆 弧的半径

    CGFloat sinval = 0, csinval = 0;
    CGFloat distance = 0;
    switch (_lineDirection) {
        case ZZLineDirection1:
        {
            pointStart = CGPointMake(rect.size.width - moveRadius, 0 + moveRadius);
            pointEnd = CGPointMake(0 + _radius, rect.size.height - _radius);

            distance = CGRectGetHeight(rect) * CGRectGetHeight(rect) + CGRectGetWidth(rect) * CGRectGetWidth(rect);

            sinval = CGRectGetHeight(rect) * CGRectGetHeight(rect)/distance;
            csinval = CGRectGetWidth(rect) * CGRectGetWidth(rect)/distance;


            movePoint2 = CGPointMake(pointStart.x - moveRadius * sinval, pointStart.y - moveRadius*csinval);
            movePoint1 = CGPointMake(pointStart.x + moveRadius*sinval, pointStart.y + moveRadius*csinval);

            centerPoint2 = CGPointMake(pointEnd.x + _radius*sinval, pointEnd.y + _radius*csinval);
            centerPoint1 = CGPointMake(pointEnd.x - _radius * sinval, pointEnd.y - _radius*csinval);
            break;
        }
        case ZZLineDirection2:
        {
            break;
        }
        case ZZLineDirection3:
        {

            break;
        }
        case ZZLineDirection4:
        {
            break;
        }

    }

    CGContextMoveToPoint(context, movePoint1.x, movePoint1.y);
    CGContextAddLineToPoint(context, movePoint2.x, movePoint2.y);
    CGContextAddLineToPoint(context, centerPoint1.x, centerPoint1.y);
    CGContextAddLineToPoint(context, centerPoint2.x, centerPoint2.y);
    CGContextClosePath(context);

    CGContextFillPath(context);
    CGContextStrokePath(context);


    CGContextAddArc(context, pointEnd.x, pointEnd.y, _radius, 0, 2*M_PI, 0);
    CGContextFillPath(context);

}
计算过程就不详细描述了,初中数学的知识就够了。接着运行下,看看效果。

从运行效果看,还是差强人意的。这显示了方案的可行性。
那么相应二三四象限的情况也能做类似的处理,这里就不贴代码了。
由于时间的关系,暂时研究到此,下一篇会把功能逐步完善。主要会包含添加文字的情形等内容,敬请期待。
如果有更好的实现方式,也请大家赐教!
Comments